Half-Elf on Tech

Thoughts From a Professional Lesbian

Category: How To

  • Disable Google Ads on One Page

    Disable Google Ads on One Page

    After my adventures with Google telling me I was hosting adult content (again, this is actually my third go-round with them), I’m here to inform you that you can now block Google Ads on one page only.

    Add a URL Channel

    First you have to tell Google what your URLs are that you want to treat differently. For that, we’ll use a URL channel which you can find at My Ads > Content > URL Channels. Now, you only get 500 of these, which means you can only flag 500 unique URLs as … well … unique.

    Add a new URL channel - It gives you some examples, but basically forget using wildcards.

    You may notice, no wildcards. So I can add halfelf.org/2012/legitimate-porn-plugins/ but not halfelf.org/.*/.*[porn].*/ which would be pretty cool. Once you’ve added your URL, you’ll see it like this:

    URL channel in place, it's basically a list of all the URLs you treat special. Nothing fancy.

    Edit Ad Settings

    I’m using Auto Ads because I’m incurably lazy, as my friend Syed knows. So I go to My Ads > Auto Ads, but if you were using specific units, you’d go to My Ads > Ad Units. There you go to the Advanced URL Settings section and click on the add button for a new URL Group.

    Advanced settings, there's a button for "New URL Group" and nothing else explanatory.

    This brings you to a page where you can select the URLs for this group. 

    A massive list of all URLs. This could get messy, Google. Thanks.

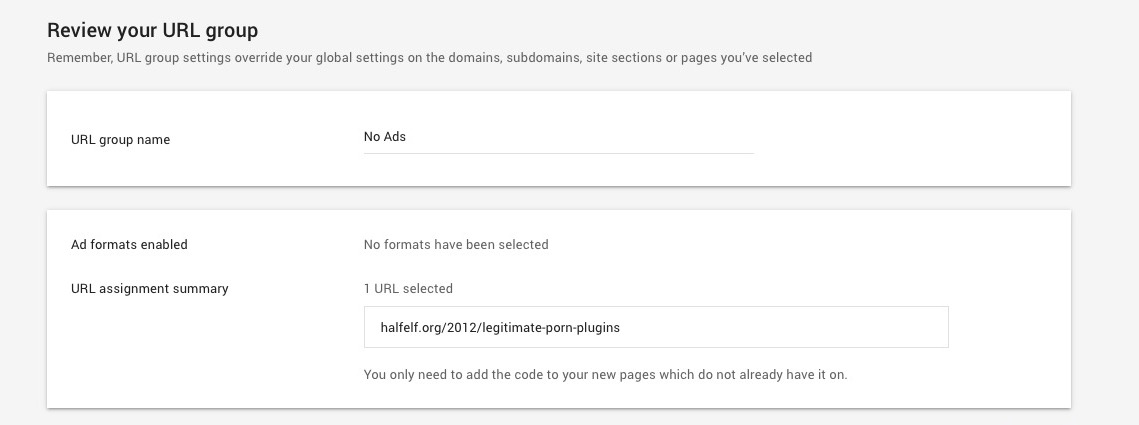
    When you’ve picked all your URLs (and yes you can add more later), click next and you’ll get a list of all the possible ad units. Uncheck them all. That’s the point of this, right? Finally you’ll review the group and give it a name. I picked “No Ads” since that’s what this was.

    Review the group, come up with a name, make sure the URLs are correct.

    Annoyances

    1. You have to add in each URL one at a time
    2. There’s no wildcards or regex
    3. You only get 500 urls
    4. You still can’t talk to a human

    All in all, it’s another day with Google.

  • cPanel ❤️ DreamObjects

    cPanel ❤️ DreamObjects

    This is something I’ve wanted for a long time. I opened a ticket with cPanel about it yonks ago as Ceph storage is offered by more than just Amazon, and yet cPanel was making it super hard to use for backups.

    Well in the next release of cPanel, this will no longer be the case! If you’re on version 74 (which is in release stage, but not current, so most people do not have it yet) you can do this.

    Add A New Backup Option

    Go to Home > Backups and open up the settings.

    In there, you can add a new Backup option. Pick S3 Compatible:

    Backing up from cPanel to DreamObjects will soon be a reality.

    Configure for DreamObjects

    Now just throw in the right data:

    You’ll want to use objects-us-east1.dream.io for the endpoint, and then your bucket and keys.

    Back it Up

    And with that you’re done. Thank you, cPanel!

  • Recording Phone Conversations

    Recording Phone Conversations

    If you have an iPhone, it’s annoying hard to record phone conversations these days. In Apple’s defence, that would be because it’s illegal to record someone without their consent in many places and, let’s face it, expecting users to know what the law is everywhere is pretty unlikely.

    Still, I had the case where I needed to record someone’s phone conversation, with their consent, for an article I was working on. And while I thought of a bunch of solutions like Audacity and Skype, I hit a wall when they said they could only use the phone.

    A screaming monkey.

    Well now it’s on to a hardware solution.

    What You Need

    The basic solution is to connect your phone to an external recording device. This is not exactly simple, as it isn’t ‘just’ plugging your phone into a recorder and pressing go. To do this with an iPhone you need:

    1. an iPhone/headphone adapter – I recommend one that allows you to use a power adapter while you’re on the phone. In case the call goes long.
    2. a male/male mono stereo cable that can convert 3.5mm to 1/4″ – Alternatively you can get a 3.5mm cable and a 1/4″ adapter.
    3. a decent XLR microphone – I prefer a lav mic (the kind you clip on) but if you want a handheld, go for it.
    4. headphones – You probably have these already. The regular 3.5mm ones.
    5. a recorder like a Zoom H4n or a Tascam DR-40 – It must have at least four input channels. The ones that have ‘two’ channels don’t allow you to plug in the phone or mic.

    There’s no software needed here, because that recorder saves to an SD card, so you’re going to be able to use that directly. I do recommend a power adapter for your recorder, as the XLR mic will be using power from the recorder and you don’t want it crapping out.

    Putting it Together

    The connection method (which you can see on my setup above) is as follows:

    1. headphones in so I can hear everything
    2. lav mic so people can hear me
    3. 1/4″ to 3.5mm adapter
    4. 3.5mm male/male cord
    5. 3.5mm to iPhone adapter

    When someone calls, I answer, make sure they’re okay with being recorded, and off I go.

    Gotchas

    There are a couple things to keep an eye on that will trip you up.

    First of all, you must use a mono cable from your phone to the recorder. Stereo will make a weird buzzing sound.

    Next, I recommend plugging in everything (including the recorder) because the XLR mic uses phantom power.

    Make sure you set up your recorder to use input 1/2 as your input. By default, mine is set to ‘mic’ which is the two channel microphone on the top of the recorder. Using that won’t do you any good at all.

    And finally? Even if you live in a one-side-consent state (all US states except 12 have this, which includes my current of California so yes, I have to ask for consent first), please please please remember to ask the person before you press record.

  • Hashtag Your Jetpack with Custom Post Types

    Hashtag Your Jetpack with Custom Post Types

    The brunt of this code comes from Jeremy Herve, who was explaining to someone how to add Category hashtags prefixed to Jetpack Publicize tweets.

    That is, someone wanted to take a category for a post (say ‘How To’) and convert that into a hashtag (say #howto).

    I too wanted to do this, but like my weirdly related posts, I needed to do the following:

    1) Get the tags
    2) Check if the tag slug was the same as a post slug for a specific custom post type
    3) Output the hashtag as all one-word, no spaces, no hyphens

    Here’s The Code

    No more explaining, here’s the code.

    class Hashtag_Jetpack {
    
    	public function __construct() {
    		add_action( 'publish_post', array( $this, 'custom_message_save' ) );
    	}
    
    	public function publicize_hashtags() {
    		$post = get_post();
    
    		// If the post isn't empty AND it's a post (not a page etc), let's go!
    		if ( ! empty( $post ) && 'post' === get_post_type( $post->ID ) ) {
    			$post_tags = get_the_tags( $post->ID );
    			if ( ! empty( $post_tags ) ) {
    				// Create list of tags with hashtags in front of them
    				$hash_tags = '';
    				foreach ( $post_tags as $tag ) {
    					// Limit this to shows only.
    					$maybeshow = get_page_by_path( $tag->name, OBJECT, 'post_type_shows' );
    					if ( $maybeshow->post_name === $tag->slug ) {
    						// Change tag from this-name to thisname and slap a hashtag on it.
    						$tag_name   = str_replace( '-', '', $tag->slug );
    						$hash_tags .= ' #' . $tag_name;
    					}
    				}
    
    				// Create our custom message
    				$custom_message = 'New post! ' . get_the_title() . $hash_tags;
    				update_post_meta( $post->ID, '_wpas_mess', $custom_message );
    			}
    		}
    	}
    
    	// Save that message
    	public function custom_message_save() {
    		add_action( 'save_post', array( $this, 'publicize_hashtags' ) );
    	}
    
    }
    
    new Hashtag_Jetpack();
    

    The only ‘catch’ you may stumble on is that I’m checking against the post type of post_type_shows – just change that as you need to.

    Voila! Instant hashtags.

    Oh and if you’re wondering why I didn’t put in a check for “Is Jetpack active…” the reason is that this is adding a post meta, and doesn’t actually depend on Jetpack being active at all. Will it ‘clutter up’ your database if Jetpack isn’t active? Yes. But it won’t break your site so it’s safe enough for me.

  • Custom Admin and Tool Bar Icons

    Custom Admin and Tool Bar Icons

    When you’re making a plugin, sometimes you need a sidebar icon. And adding those in is relatively simple, depending on how you do it. But when you’re adding in something to the toolbar, things get a little messier…

    Dashicons and the Admin Sidebar

    The easiest way to add in an icon is to use a Dashicon – part of a set of icons developed by WordPress itself. These are designed to just work with WordPress, and you can include it in your call to add a menu page like so:

    add_menu_page( 'HalfElf', 'HalfElf', 'manage_options', 'varnish-page', 'halfelf_settings_page', 'dashicons-carrot', 75 );
    

    These will automatically change colors for you when people change their profile colors.

    Dashicons and the Toolbar

    But what if you want to add a menu to the toolbar? Well this is a little bit more complicated, due to the fact that there just isn’t a built in way to add that icon.

    When you add in a toolbar menu, it looks like this:

    add_action( 'admin_bar_menu', 'halfelf_add_admin_bar_menu', 999 );
    function halfelf_add_admin_bar_menu( $wp_admin_bar ) {
    	$args = array(
    		'id'    => 'halfelf_add_admin_bar_menu',
    		'title' => 'HalfElf',
    		'href'  => 'https://example.com',
    	);
    	$wp_admin_bar->add_node( $args );
    }
    

    While I think the array should accept ‘icon’, it doesn’t, which means you have two choices to add in your icon:

    1) Put <span class="dashicons dashicons-carron"></span> in front of the ‘HalfElf’ on the title line
    2) Use some CSS

    Personally I pick option 2, because that will allow the icon to show when the screen is in mobile view, and all you see are the icons.

    For that to work, I have the following custom CSS:

    #wpadminbar #wp-admin-bar-purge-varnish-cache .ab-icon:before {
    	content: '\f511'; 
    	top: 4px;
    }
    
    @media screen and (max-width: 782px) {
    	#wpadminbar li#wp-admin-bar-purge-varnish-cache{
    		display: block!important;
    	}
    }
    

    I call it on the front and back end, and this works pretty well.

    Adding a Custom SVG

    But. What happens when your coworker doesn’t like your joke about the carrot? Well now we’re into the weird land of “I want to use a Custom SVG for my admin bar and my toolbar.” And this is strange because while you can just echo out the SVG, the color can be a bit of a mess. Unlike a font-icon, SVGs don’t always play nicely with the sidebar. You have to define their colors in order for the fill replacement to work, and even then I found out that it doesn’t go well with the toolbar!

    I lifted a page from Yoast SEO, who uses a function get_icon_svg() and calls it in place of 'dashicons-carrot', making my menu this:

    add_menu_page( 'HalfElf', 'HalfElf', 'manage_options', 'varnish-page', 'halfelf_settings_page', get_icon_svg( true, '#82878c' ), 75 );
    

    Yoasties, if you’re wondering why I have the extra variable, let me explain.

    In their default, they have a one parameter, the true/false, and it defaults to true, so they just use get_icon_svg() and call it a day. But I had cases where I wanted things to have specific colors, so I added in a parameter for the color. In addition, I put in some extra checks on how to determine the color based on what admin colors the user had selected:

    function get_icon_svg( $base64 = true, $icon_color = false ) {
    	global $_wp_admin_css_colors;
    
    	$fill = ( false !== $icon_color )? sanitize_hex_color( $icon_color ) : '#82878c';
    
    	if ( is_admin() && false === $icon_color  ) {
    		$admin_colors  = json_decode( json_encode( $_wp_admin_css_colors ), true ) ;
    		$current_color = get_user_option( 'admin_color' );
    		$fill          = $admin_colors[$current_color]['icon_colors']['base'];
    	}
    
    	$svg = '<svg version="1.1" xmlns="http://www.w3.org/2000/svg" xml:space="preserve" width="100%" height="100%" style="fill:' . $fill . '" viewBox="0 0 36.2 34.39" role="img" aria-hidden="true" focusable="false"><g id="Layer_2" data-name="Layer 2"><g id="Layer_1-2" data-name="Layer 1"><path fill="' . $fill . '" d="M24.41,0H4L0,18.39H12.16v2a2,2,0,0,0,4.08,0v-2H24.1a8.8,8.8,0,0,1,4.09-1Z"/><path fill="' . $fill . '" d="M21.5,20.4H18.24a4,4,0,0,1-8.08,0v0H.2v8.68H19.61a9.15,9.15,0,0,1-.41-2.68A9,9,0,0,1,21.5,20.4Z"/><path fill="' . $fill . '" d="M28.7,33.85a7,7,0,1,1,7-7A7,7,0,0,1,28.7,33.85Zm-1.61-5.36h5V25.28H30.31v-3H27.09Z"/><path fill="' . $fill . '" d="M28.7,20.46a6.43,6.43,0,1,1-6.43,6.43,6.43,6.43,0,0,1,6.43-6.43M26.56,29h6.09V24.74H30.84V21.8H26.56V29m2.14-9.64a7.5,7.5,0,1,0,7.5,7.5,7.51,7.51,0,0,0-7.5-7.5ZM27.63,28V22.87h2.14v2.95h1.81V28Z"/></g></g></svg>';
    
    	if ( $base64 ) {
    		return 'data:image/svg+xml;base64,' . base64_encode( $svg );
    	}
    
    	return $svg;
    }
    

    Personally I find it pretty crazy, and the icon on the toolbar doesn’t reflect the changes until the page is reloaded, but that’s a small price to pay since it doesn’t happen all that often.

  • Image Attribution

    Image Attribution

    Did you know you could add fields to the media uploader?

    In my case, I was at a convention and a fellow reporter (welcome to my new weird life) muttered she wished it was easier to have just a photo ‘credit’ line when she uploaded media from networks. I asked what system she used to run her site and when she said WordPress, I gave her my biggest smile.

    Image Filters

    There are two things we need to filter here.

    1. Add our attribution field to the editor
    2. Save the attribution data

    That’s it. WordPress handles the rest.

    add_filter( 'attachment_fields_to_edit', 'halfelf_add_attachment_attribution', 10000, 2);
    add_action( 'edit_attachment', 'halfelf_save_attachment_attribution' );
    
    function halfelf_add_attachment_attribution( $form_fields, $post ) {
    	$field_value = get_post_meta( $post->ID, 'HALFELF_attribution', true );
    	$form_fields[ 'HALFELF_attribution' ] = array(
    		'value'    => $field_value ? $field_value : '',
    		'label'    => __( 'Attribution' ),
    		'helps'    => __( 'Insert image attribution here (i.e. "NBCUniversal" etc)' )
    	);
    	return $form_fields;
    }
    
    function halfelf_save_attachment_attribution( $attachment_id ) {
    	if ( isset( $_REQUEST['attachments'][$attachment_id]['lwtv_attribution'] ) ) {
    		$attribution = $_REQUEST['attachments'][$attachment_id]['HALFELF_attribution'];
    		update_post_meta( $attachment_id, 'HALFELF_attribution', $attribution );
    	}
    }
    

    End Result?

    It shows up a little lower down than I’d like (I’d prefer it to be up where the URL is) but it works:

    An example of Image Attribution

    Oh and yes, I emailed her the code as a stand-alone plugin. Her IT person was thrilled.